 Nagi.md
Guide
Editing in every edition
The web app, VS Code extension and desktop app share the same editor. This page covers what works the same everywhere.
Write as you see
Click the document and type. Markdown syntax turns into formatting as you type. Press Ctrl+Z right after a conversion to get the original characters back.
#+ space- Creates a heading. Use
##or###for lower levels. -+ space- Creates a bulleted list.
1.+ space creates a numbered list. - [ ]+ space- Creates a checklist.
>+ space- Creates a quote.
**bold**- Typing the closing
**makes the text bold.`code`and[name](URL)work the same way. You can also select text and type*or`to wrap it. /at line start- Opens the insert menu for headings, tables, code blocks, diagrams, math, images and more.
The Format and Paragraph menus apply the same formatting.
Top-right buttons
Buttons for switching the view are at the top right. Hover over one to see its name.
 1234
1234- Document width: expands the document to the full window. Press again to return to the normal width.
- Light / dark: switches colors. The icon is a sun in light mode and a moon in dark mode.
- Themes: opens the page for comparing and choosing document themes.
- Source view: switches to editing the raw Markdown.
In the VS Code extension and the desktop app, documents tracked by Git also show a diff button.
Switch to source
Use the </> button at the top right or Ctrl+/ to edit the raw Markdown. Press it again to return; the cursor and scroll position carry over. Undo history is shared by both views.
Saving after editing in rendered mode may normalize the notation of the parts you changed. Untouched parts keep their original notation. Use source view when the exact notation matters.
Tables
- Click a cell and type. Tab moves to the next cell and adds a row at the last cell.
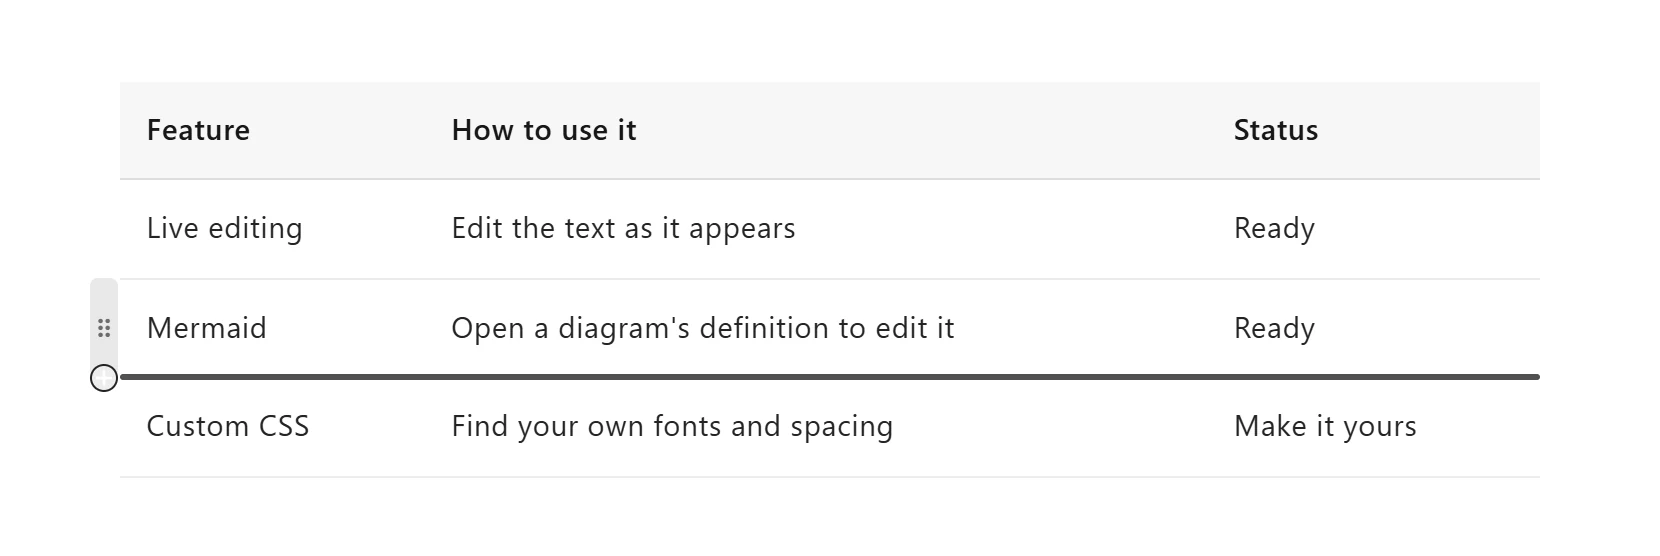
- Right-click a cell to add, delete or move rows and columns. Drag the handles that appear on hover to reorder them, and use the “+” at either end of a handle to insert.
- Copy a cell range to paste it straight into Excel or Google Sheets. Pasting a range copied from Excel fills the cells.
- Create a table from Format → Insert Table, or type
| Head | Next |and| --- | --- |on two lines.
Diagrams, code and math
- Mermaid and PlantUML: click a diagram to open its definition below and see changes as you edit. PlantUML renders without Java or an external server. See PlantUML support for supported diagram types.
- Code: type
```and a language name at the start of a line, then Space or Enter. Click the language name at the top right of the block to change highlighting. - Math:
$x^2$creates inline math and$$x^2$$a math block. Use the TeX button to edit an expression. - Alerts and footnotes: start a quote with
[!NOTE]for an alert, and use[^1]for footnotes.
Images and links
- Paste or drop images, or use Format → Insert Image. Where images are stored differs by edition.
- Loading an image from the internet tells its server your IP address, so remote images appear after you allow them in the bar above the document.
- Use the magnifier at the top right of a diagram or image to enlarge it. Hold Ctrl and scroll to zoom.
- Click a link to open it.
#headingjumps within the document. Obsidian-style[[note]]links are displayed too.
Find and replace
Ctrl+F opens Find and Ctrl+H opens Replace. Enter or F3 goes to the next match, and Shift+Enter or Shift+F3 to the previous one. The “Aa”, “ab” and “.*” toggles switch case sensitivity, whole words and regular expressions. Both views support search, and Ctrl+Z undoes Replace All in one step.
Appearance and themes
- The sun / moon icon at the top right switches between light and dark.
- View → Appearance sets the typeface, text size, document width and line spacing.
- View → Themes compares the bundled document themes. Document CSS / LESS from Typora and Markdown Preview Enhanced can be loaded too.
- The width button at the top right expands the document to the full window.
HTML, PDF and printing
Use the lower part of the File menu to save HTML, save a PDF or print. Choose paper, orientation, margins and the document theme. Output uses light colors even in dark mode and includes diagrams and images. How PDFs are saved differs by edition.
When another app changes the document
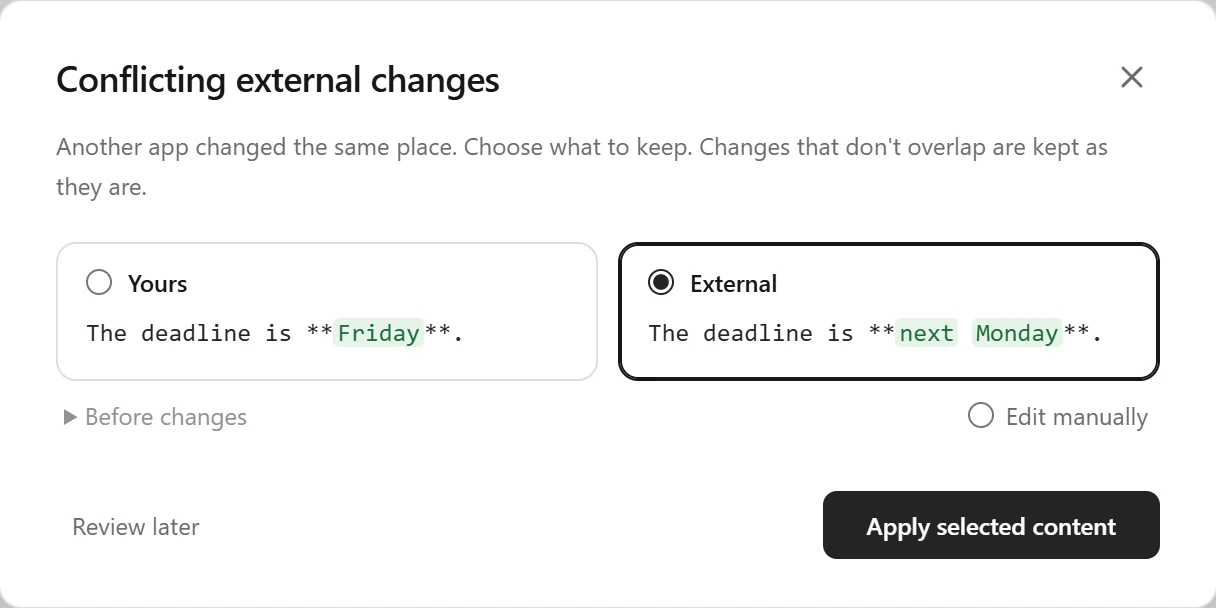
If AI tools or another editor change the file while you edit, changes in separate places are merged with your input. When they overlap, your input is kept, auto save pauses, and Review Conflicts appears. For each conflict choose your version, the external version or a manual edit, apply, and then save.
Main shortcuts
On macOS use ⌘ in place of Ctrl. The VS Code extension leaves some keys to VS Code itself (see the VS Code guide).
| Save / Save As | Ctrl+S / Ctrl+Shift+S |
|---|---|
| Bold / Italic / Inline code | Ctrl+B / Ctrl+I / Ctrl+E |
| Strikethrough | Alt+Shift+5 |
| Insert link | Ctrl+K |
| Heading 1–6 / Paragraph | Ctrl+Alt+1–6 / Ctrl+Alt+0 |
| Bulleted / Numbered / Checklist | Ctrl+Shift+8 / 7 / 9 |
| Move / Duplicate block | Alt+↑↓ / Alt+Shift+↑↓ |
| Toggle source view | Ctrl+/ |
| Find / Replace | Ctrl+F / Ctrl+H |
| Sidebar / Focus mode | Ctrl+Shift+L / F8 |
| Zoom in / out / 100% | Ctrl++ / Ctrl+- / Ctrl+0 |
Try every syntax on the Demo page. See Apps for differences between editions.